


Kitchen Island Design and Install: The Complete Homeowner’s Guide

A kitchen island is a structural engineering project disguised as furniture. You likely envision your kitchen as a bustling hub for morning coffee and late-night homework, yet the fear of a cramped, awkward layout often holds you back. Finding the right balance for your kitchen island design and install means more than just picking a pretty countertop. It's about ensuring your space flows naturally while meeting the strict demands of modern building codes and your family's daily needs.
We understand that the technical details can feel overwhelming, especially with the 2026 National Electrical Code updates that now require work-surface outlets instead of side-mounted ones. This guide will help you master the art of planning a custom island that boosts your home value and serves as a professional-grade workstation. We'll walk you through the essential clearances, help you choose between storage and seating, and provide a clear roadmap for a seamless installation process. Get ready to transform your Iowa home with a design that's as functional as it is beautiful.
Table of Contents
Defining the Purpose: What Is Your Kitchen Island’s Primary Job?
Before you select a single slab of quartz, you must define the mission. Every successful kitchen island design and install begins with a clear understanding of your daily workflow. Are you a weekend baker who needs massive counter space, or is your kitchen the primary gathering spot for family game nights? Efficiency is born from focus. A cluttered island is often just a glorified table that gets in your way.
Traditional kitchens once relied solely on the "Work Triangle" between the sink, stove, and fridge. Modern Iowa layouts have shifted toward "Work Zones." This approach organizes your kitchen into distinct areas for specific tasks like prep, cooking, and cleaning. What is a kitchen island? It's the central bridge that connects these zones. If your island's primary job is cleanup, you'll need integrated dishwashers and deep basins. If it's for prep, you need immediate access to the range.
Your primary goal also dictates your construction requirements. A prep-heavy island needs a durable, heat-resistant surface and reinforced subflooring to handle the weight of high-end stone. An entertainment hub might prioritize a "waterfall" aesthetic with integrated LED lighting. Resist the urge to make one island do everything. Cramming a sink, a cooktop, and seating for six into a single structure often leads to a cluttered, inefficient design that lacks the necessary clearance for actual cooking.
The Chef’s Prep Station
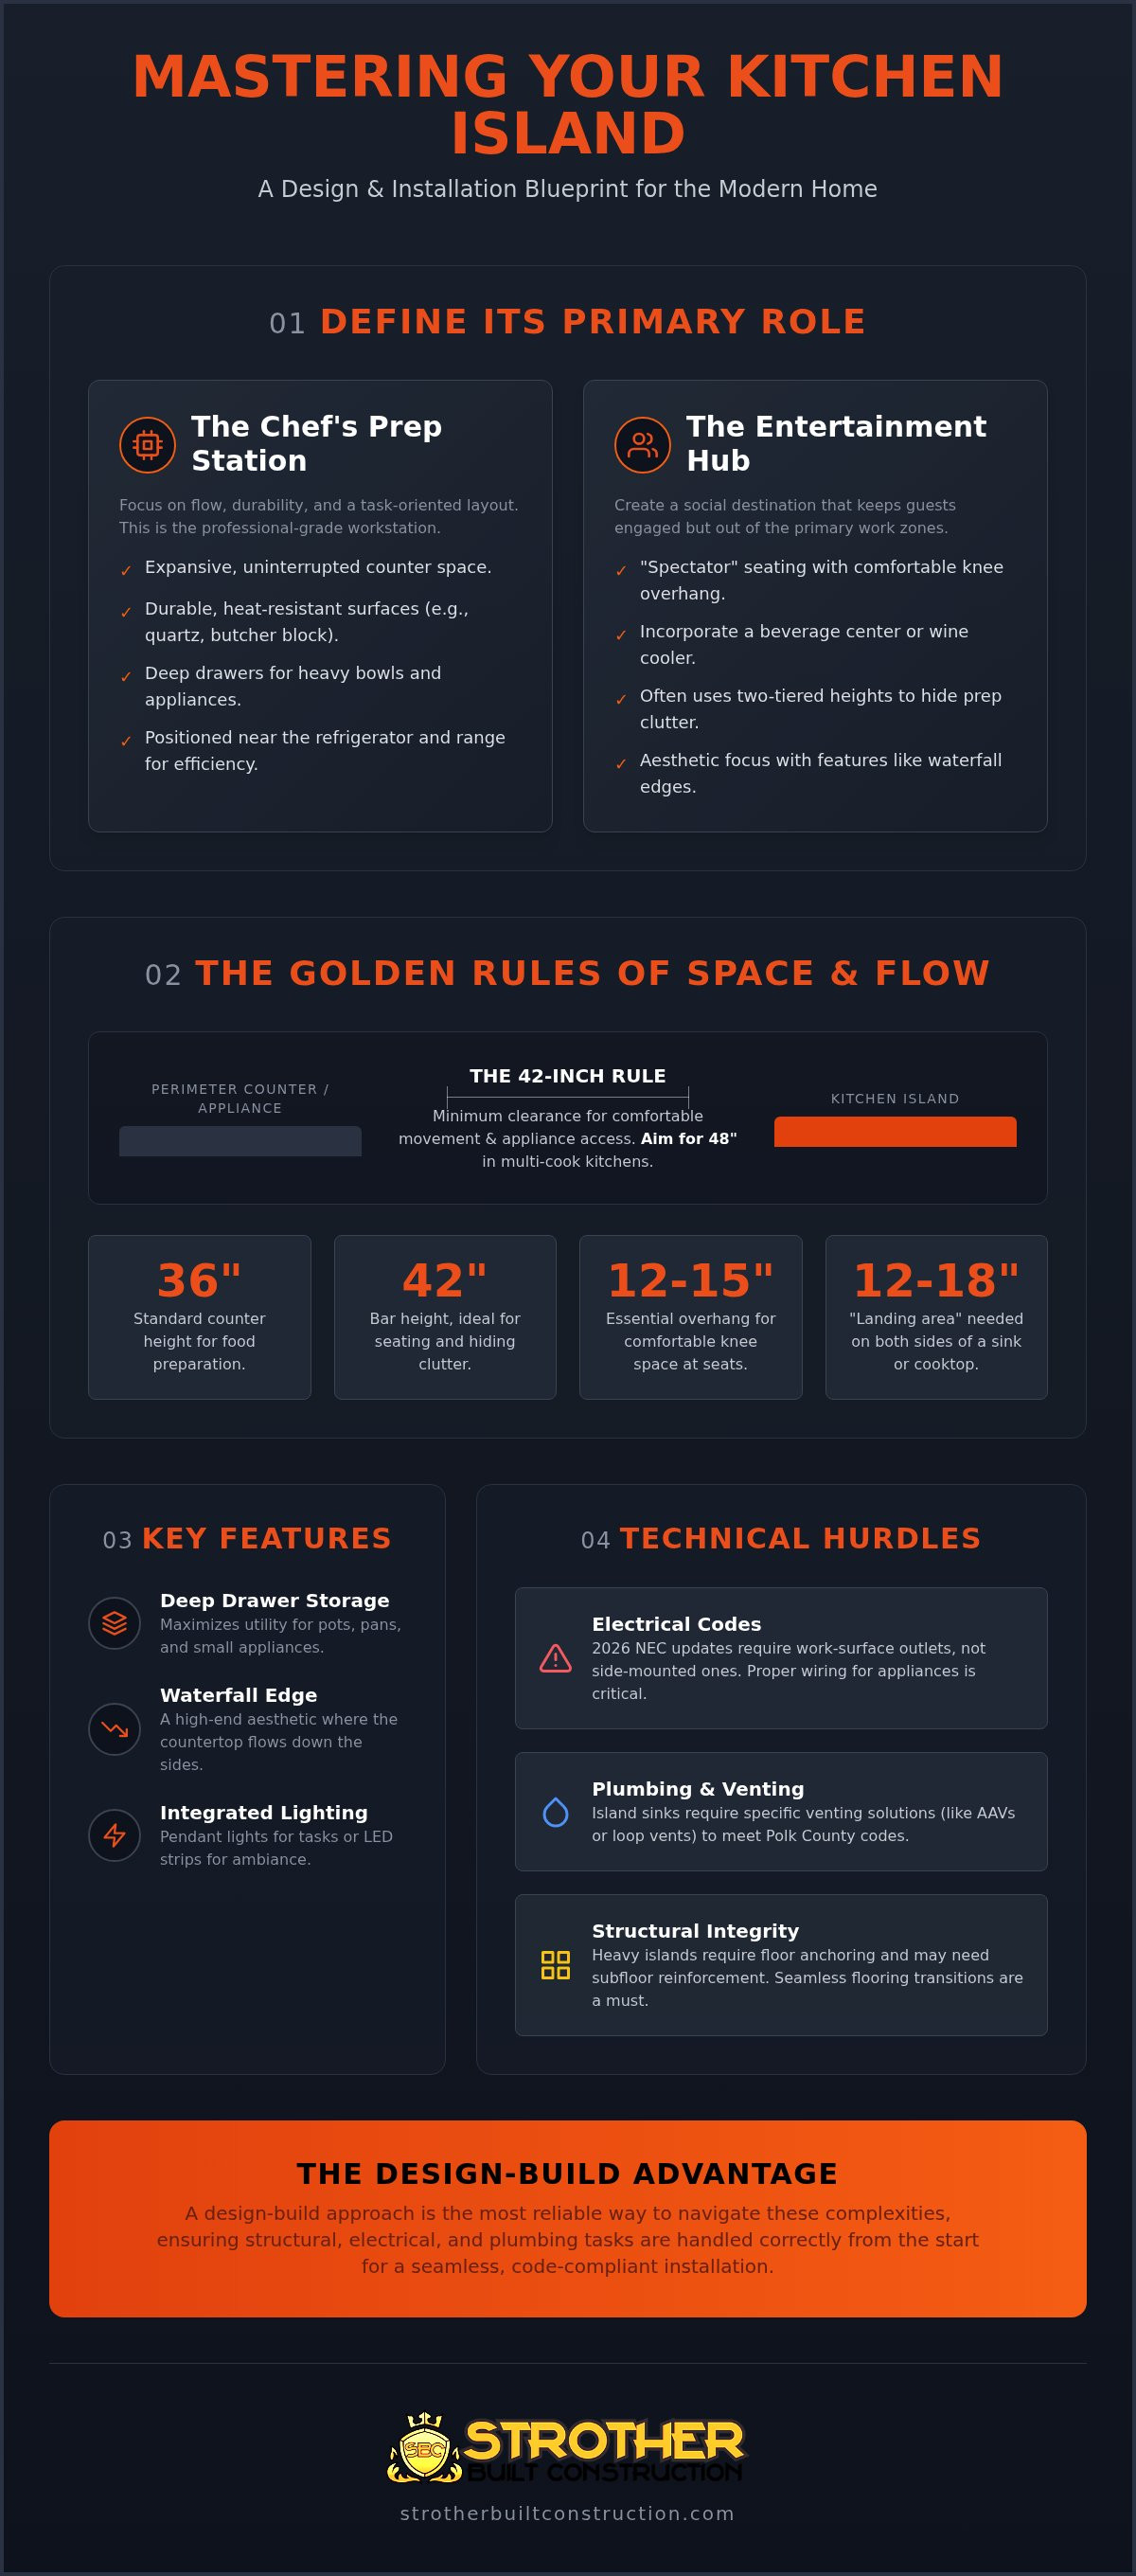
Focus on flow and durability. A dedicated prep station requires expansive, uninterrupted counter space. Consider integrating a butcher block section for direct chopping or a specialty stone slab for pastry work. Position this station within a few steps of the refrigerator to minimize travel time. High-quality custom cabinetry here should prioritize deep drawers for heavy mixing bowls and pull-out bins for organic waste.
The Entertainment and Seating Hub
Turn your kitchen into a social destination. Design your island with "spectator" seating that keeps guests engaged but out of the cook's path. A proper overhang of 12 to 15 inches is essential for knee comfort. To maximize the social utility of your kitchen island design and install, incorporate a wine cooler or a dedicated beverage center. This allows guests to serve themselves without interrupting the meal preparation.
The Golden Rules of Kitchen Island Dimensions and Clearances
Precision is the difference between a kitchen that feels spacious and one that feels like an obstacle course. When planning your kitchen island design and install, the 42-inch rule is your most critical measurement. This refers to the clearance between the island and the surrounding cabinets or appliances. While some builders suggest a minimum of 36 inches, we recommend at least 42 inches for single-cook households. If you often have multiple people prepping meals or children running through the space, aim for 48 inches. This ensures that dishwasher doors and oven racks can open fully without blocking traffic or creating a safety hazard.
Standard island heights generally fall into two categories. A 36-inch height matches your perimeter counters and is ideal for food preparation. A 42-inch height creates a "bar" feel, which is excellent for hiding kitchen clutter from guests in adjacent living areas. If you plan to include a sink or stovetop, calculate a "landing area" of at least 12 to 18 inches on either side. This provides a safe spot for hot pans, prep bowls, or drying dishes. Without this buffer, your island will quickly feel cramped and disorganized.
Don't commit to a layout based on a 2D drawing alone. We always suggest a "cardboard mockup" phase. Tape together boxes to match the island's intended footprint and place them in your kitchen for a few days. Walk around them. Open your fridge. This physical test often reveals clearance issues that blueprints miss. Our architectural design services can help you refine these measurements before the first cabinet is ever anchored to your floor.
Sizing Your Island for Your Specific Floor Plan
To remain functional, an island should be at least 2 feet by 4 feet. Anything smaller lacks enough storage or prep space to justify the floor area it occupies. Conversely, avoid making the island wider than 4 feet. If you can't reach the center of the countertop to wipe it down, the island is too large. Your layout style also matters. L-shaped or T-shaped islands work beautifully in open-concept spaces, while galley-style islands are perfect for maintaining a narrow, efficient workflow in smaller homes.
Seating and Overhang Specifications
Comfortable seating requires more than just high stools. Follow the 12-inch rule for legroom at a standard 36-inch counter. This overhang ensures guests don't knock their knees against the cabinetry. For the width, allow 24 linear inches per person. This prevents guests from feeling elbowed during a meal. If your countertop material is heavy, like granite or quartz, any overhang exceeding 10 inches requires structural support. Use hidden steel brackets or decorative corbels to keep the surface stable and safe for your family.
Essential Design Features: Storage, Lighting, and Aesthetics
A successful kitchen island design and install does more than just fill floor space; it anchors the room’s visual identity. While your perimeter cabinets often blend into the walls, the island is your chance to make a bold statement. Many Des Moines homeowners choose a contrasting color for the island base, such as a deep navy or charcoal, to create a stunning focal point. This contrast highlights the island as a piece of custom furniture rather than just a utility block. It’s a simple design choice that adds immediate character and sophisticated flair to your home.
Smart Storage Solutions
Storage is where your island truly earns its keep. We recommend prioritizing deep drawers over standard lower cabinets. Drawers allow you to see everything at once and eliminate the need to crawl on the floor to find a lost pot lid. Beyond the basics, consider these high-utility additions:
Pull-out trash and recycling centers: These keep unsightly bins hidden and accessible right where you do the most prep work.
End-cap shelving: Use the short sides of the island for cookbooks or decorative displays to soften the transition to the living area.
Hidden charging drawers: Install outlets inside a top drawer to keep phones and tablets off the clean countertop while they charge.
One of the most striking trends in contemporary Iowa homes is the "Waterfall Edge." This design continues the countertop material down the sides of the island to the floor, creating a seamless, architectural look. It’s a sophisticated way to showcase high-end stone. To illuminate this feature, you need layers of lighting. Combine large decorative pendants for style with recessed task lighting for actual work. Dimmable switches are essential here, allowing you to shift from bright prep light to a warm, social glow in seconds.
Countertop Material Selection
The choice between quartz and granite often comes down to your lifestyle. Quartz is incredibly popular because it's engineered to be non-porous and scratch-resistant, making it nearly maintenance-free for busy families. Granite offers a unique, natural beauty but requires periodic sealing to prevent stains. You don't have to choose just one, though. Some of our favorite projects involve mixing materials, using a durable stone for the prep zone and a warm wood butcher block for the seating area. Non-porous surfaces like quartz or polished stone are preferred for island prep zones because they prevent bacteria and food stains from penetrating the surface. These thoughtful material choices ensure your kitchen island design and install remains a beautiful, hygienic hub for years to come.
Technical Integration: Plumbing, Electrical, and Gas
Moving utilities from a wall to a free-standing island is the most technically demanding phase of any kitchen island design and install. It requires cutting into subfloors and carefully routing lines through the narrow cavities of your cabinetry. This is why precise "rough-ins" are vital. If a gas line or drain pipe is even two inches off, your integrated appliances won't fit. This leads to costly delays and unnecessary structural modifications that can stall your project for weeks.
Plumbing presents a unique hurdle because of venting requirements. Unlike wall sinks that vent straight up through a wall cavity, island sinks require an "island vent" loop system or an Air Admittance Valve (AAV). These systems prevent sewer gases from entering your home while allowing water to drain properly. If your home has a slab-on-grade foundation, which is common in many Des Moines home additions, this process involves trenching through concrete. Similarly, gas lines for island ranges require specialized overhead or downdraft ventilation to meet local safety standards and prevent heat buildup.
Powering Your Island
Electrical codes changed significantly in 2026, and staying compliant is essential for your home’s safety and resale value. Under the current National Electrical Code (NEC), if you choose to install outlets to serve the island's work surface, they must be located on the countertop itself. Side-mounted outlets below the counter are no longer permitted for this purpose. Pop-up outlets that retract into the stone are now the gold standard for a clean, code-compliant look. Remember that high-draw appliances like microwaves or wine fridges require dedicated circuits to prevent tripped breakers. Our kitchen remodeling team handles these complex Polk County permit requirements to ensure your project meets every local standard.
Sinks and Appliances
When choosing a sink, consider your primary workflow. A full-size sink turns the island into a cleanup zone, while a smaller "prep" sink keeps the island dedicated to cooking and entertaining. If you install a sink, your dishwasher must be immediately adjacent to simplify plumbing and minimize water dripping across your floor. To save valuable counter space, consider under-counter microwaves or warming drawers. These integrated solutions keep your sightlines clear while providing professional-grade functionality in a compact, organized footprint.
Professional Installation: Why the Design-Build Approach Wins
While big-box retailers suggest you can build an island from stock cabinets in a weekend, professional kitchen island design and install requires far more than basic assembly. An island is a massive architectural feature that places significant weight on a concentrated area of your floor. Without proper subfloor reinforcement and secure floor anchoring, heavy quartz or granite countertops can cause sagging or shifting over time. A professional team ensures your island is structurally sound and perfectly level, protecting your investment for decades.
A common pitfall in DIY or fragmented projects is the flooring transition. If you install an island over existing hardwood or tile, you must plan for how the cabinetry meets the floor to avoid unsightly gaps or mismatched material. Our design-build approach integrates the flooring plan from day one. We coordinate the precise timing of the install so that the base molding and flooring create a seamless, built-in look that enhances your home's resale value and aesthetic appeal.
Project management is the hidden engine of a successful installation. You aren't just hiring a carpenter; you're coordinating a plumber for the sink, an electrician for the pop-up outlets, and a stone fabricator for the waterfall edge. Managing these moving parts on your own often leads to scheduling conflicts and code violations. A professional firm handles every Polk County permit and inspection, ensuring that the technical integration happens safely and on schedule.
The Strother Built Custom Advantage
Our integrated approach means your island isn't designed in a vacuum. We provide architectural oversight to ensure the island complements the scale and style of your entire home. Instead of settling for standard sizes, our custom cabinetry is tailored to your specific storage needs, from vertical tray dividers to hidden charging stations. Explore our kitchen remodeling services to see how we blend professional-grade functionality with stunning Iowa-inspired design.
Timeline and What to Expect
The journey from initial design renderings to the final countertop polish typically moves through several structured phases. We begin with detailed 3D models so you can visualize the flow of your new space before construction starts. During the install, we prioritize dust containment and site protection to minimize disruption to your daily life. Our process concludes with a final walkthrough and a comprehensive quality assurance checklist. We verify every drawer glide, outlet, and plumbing connection to ensure your new kitchen hub is ready for years of social gatherings and meal prep.
Build a Kitchen Hub That Lasts
A successful kitchen island design and install is the perfect blend of architectural precision and personal style. You now have the roadmap to define your workflow zones, master critical clearances, and navigate the technical complexities of modern building codes. Whether you envision a professional chef's prep station or a vibrant social center for your family, the key is a design that prioritizes both function and longevity. Moving utilities and reinforcing subfloors are tasks that require a steady, expert hand to ensure your investment adds real value to your home.
Take the stress out of your remodel by partnering with a team that understands the local landscape. With over 13 years of Des Moines remodeling expertise, Strother Built Construction offers comprehensive design-build services that bring your vision to life. As a fully licensed and insured Iowa general contractor, we manage every detail from the first rendering to the final polish. Start your kitchen transformation with a Strother Built design consultation today. It's time to create the beautiful, functional heart of the home you've always wanted.
Frequently Asked Questions
Do I need a permit to install a kitchen island in Des Moines?
Yes, you generally need a permit if your project involves electrical, plumbing, or gas work. In Des Moines and Polk County, any modifications to these essential systems require professional oversight to ensure they meet the 2026 National Electrical Code. While a simple, non-utility island might be exempt, a full kitchen island design and install typically requires formal approval to protect your home’s safety and resale value.
Can I put a stove on my kitchen island without a hood?
It is highly recommended to install a ventilation system, such as a downdraft or overhead hood, when placing a stove on an island. While some local codes might vary on the strict requirement for a hood, the International Residential Code mandates specific clearances from combustible surfaces. Without proper ventilation, grease and heat will accumulate in your open-concept living area, potentially damaging your cabinetry and air quality.
How much space do I need around my kitchen island for walking?
You should maintain a minimum of 42 inches of clearance between the island and your surrounding counters. If your kitchen often has multiple cooks working at once, 48 inches is the preferred standard to prevent crowding. This walkway width ensures that appliance doors can open fully and that traffic flows smoothly without creating bottlenecks in your primary work zones.
Is it cheaper to buy a pre-made island or have one custom-built?
Buying a pre-made island is initially less expensive, but a custom-built solution offers significantly higher long-term value. Custom islands allow you to maximize every inch of storage with deep drawers and tailored cabinetry that stock options can't match. Professional kitchen island design and install also ensures the piece is structurally anchored to your floor and seamlessly integrated with your home’s architectural style.
What is the best lighting for a large kitchen island?
The most effective setup for a large island is a combination of decorative pendants and recessed task lighting. Position two or three pendants over the seating area to create a focal point and provide a warm glow for social interaction. Supplement these with recessed lights directly over the prep zones to ensure you have clear, shadow-free visibility while using knives or reading recipes.
How do I add electricity to an island if I have a concrete slab floor?
Adding electricity to an island on a concrete slab requires trenching a small channel into the floor to house the electrical conduit. This process involves cutting a narrow path through the concrete, laying the lines, and then patching the slab before installing your new flooring. It is a technical task that must be handled by a licensed professional to ensure the conduit is buried at the correct depth.
Can a kitchen island be moved later if I change my mind?
A built-in kitchen island cannot be easily moved once it is anchored to the floor and connected to utilities. If you want flexibility, a movable kitchen cart on casters is a better option, though it lacks the storage and functionality of a permanent fixture. Once plumbing or electrical lines are integrated into the island, relocation becomes a major renovation project involving floor repairs and utility rerouting.
What is the standard height for kitchen island seating?
The standard height for island seating depends on whether you choose a counter-height or bar-height design. For a standard 36-inch counter, your stools should have a seat height of approximately 24 to 26 inches. If you opt for a raised 42-inch bar top, you'll need stools with a 30-inch seat height to ensure your guests can sit comfortably with proper legroom.


Comments